Chyby pri inštalácii šnekového reduktora a ako ich opraviť
Every installation error in this guide has produced a real worm gear reducer závitovkový redukčný prevod failure — often months after installation, when no one remembered the shortcut that was taken. Understanding these mistakes from the “wrong” angle fixes them in memory far more effectively than a step-by-step procedure alone.
Why Installation Errors Are the Second Most Common Cause of Premature Failure
Field data from worm gear reducer installation warranty claims and technical reports on worm gear reducers and field service reports consistently shows that installation errors account for roughly 30–35% of premature failures — second only to maintenance neglect. Most of these failures share a characteristic: they are not immediate. A hammer blow that fractures a bearing inner race produces a running unit that sounds fine for 2,000 hours, then fails unexpectedly. A misaligned coupling produces a unit that runs fine at no load, then begins overheating and leaking at full load after several months.
This time delay between installation and failure makes root cause analysis difficult — by the time the závitovkový redukčný prevod fails, the installer has moved on and the installation record is incomplete. The failure is attributed to “product quality” rather than installation technique.
The ten errors in this guide are presented from the perspective of the damage they cause — because understanding the failure mechanism makes the correct technique impossible to forget. This guide complements K-06, which provides the correct step-by-step installation procedure — here, we approach the same installation from the direction of what goes wrong.
10 Installation Errors — With Severity, Damage Mechanism, and Correct Technique
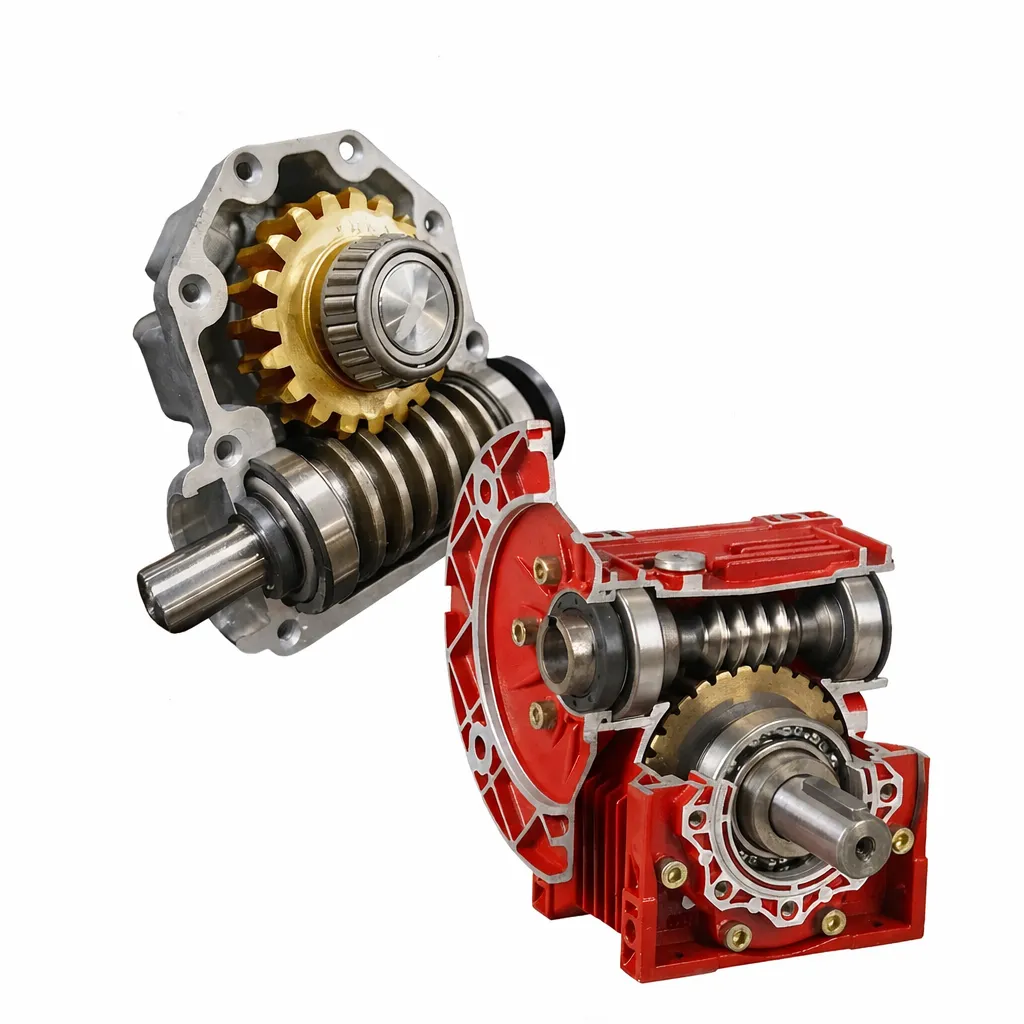
Error 1: Driving a Coupling or Pulley onto the Shaft with a Hammer
What happens: Each hammer blow transmits a shock load directly through the worm gear reducer shaft of several hundred to several thousand Newtons directly through the shaft into the input bearing inner race. The inner race, made from bearing steel with a hardness of 60+ HRC, cannot deform — it fractures. The fracture may be a full crack or a network of subsurface microcracks. Either way, the bearing life is permanently and significantly shortened.
Timeline to failure: Full crack — bearing fails within 500–2,000 hours with progressive noise and vibration. Microcrack damage — bearing fails at 3,000–8,000 hours. Neither failure is detectable without inspection during or after installation.
Correct technique: Use a bearing/coupling installation tool (puller in reverse) or a threaded bolt-and-nut arrangement that presses the coupling onto the shaft progressively. For interference-fit pulleys on larger shafts, heat the pulley to 80–100°C first — it expands and slides on with minimal force. The component should resist, not require force.
Error 2: Mounting on a Warped or Uneven Surface Without Shimming
What happens: The worm gear reducer housing is a precision structural element that holds the worm shaft and worm wheel in precise relative geometry. When the housing is forced against a non-flat surface by tightening the mounting bolts, the housing body distorts. Even a 0.2 mm surface irregularity can produce enough housing deformation to shift the worm-wheel mesh center distance by 0.05–0.1 mm — changing the tooth contact pattern, increasing noise, and concentrating load on part of the tooth face.
Recognizing this problem: The unit makes an unusual grinding or whining noise after installation that wasn’t present during a factory test. Oil seal leakage appears within the first 1,000 hours at the output shaft end, because the seal bore is no longer round after housing distortion.
Correct technique: Check mounting surface flatness with a straightedge and feeler gauge before tightening any bolt. Tolerance: ≤0.1 mm per 300 mm. Shim low spots with stainless shim stock (0.05 mm and 0.1 mm stock). Tighten bolts in a star pattern to ensure even clamping.
Error 3: Poor Shaft Alignment Accepted as “Close Enough”
What happens: A misaligned coupling on a worm gear reducer introduces a rotating bending load into the worm shaft at the input bearing. This load is not in the datasheet Fr₁ allowance — it is an additional load on top of the drive loads, and it cycles once per shaft revolution. At 1,450 rpm that is 24 load cycles per second, or 86 million cycles per hour of operation.
Consequence: Input shaft bearing life reduction follows the inverse cube law for radial load — doubling the bearing load reduces L10h life to one-eighth. An angular misalignment of 0.15 mm per 100 mm can easily double the effective bearing load from coupling reaction, cutting bearing life from 20,000 hours to 2,500 hours.
Correct technique: Measure with a dial indicator. Maximum radial runout: 0.05 mm. Maximum angular offset: 0.05 mm per 100 mm coupling diameter. If beyond tolerance, adjust motor position — do not rely on the flexible coupling element to absorb misalignment.
Error 4: Wrong Oil Level for Mounting Orientation
What happens: The oil fill in a worm gear reducer is factory set for horizontal mounting (M1). If the unit is installed vertically or inverted without adjusting the oil volume, the oil level relative to the gear mesh is wrong. In a vertical installation with output shaft up, the oil fills to below the worm wheel — the mesh runs partially dry. With output shaft down, the oil reaches the upper shaft seal — seepage begins almost immediately.
Correct technique: Confirm installation orientation before filling. Check the orientation-specific oil volume table in the manufacturer’s manual. The oil fill plug position also changes by orientation — the vent plug must be at the highest point of the installed housing. Always confirm both oil volume and vent plug position for non-standard orientations.
Error 5: Skipping the No-Load Trial Run and Starting at Full Load
What happens: The no-load trial run for a newly installed worm gear reducer is not a formality — it is a diagnostic stage that reveals installation errors before they become expensive. Running at full load immediately subjects the gear mesh and bearings to maximum stress before the run-in process has improved tooth contact distribution, and before any installation problem has had a chance to manifest at low speed and low load where it is easy to catch.
Correct technique: 30 minutes no-load, then 30 minutes at 50% load, then 1 hour at full load. Each stage should be observed for abnormal noise, temperature rise, and vibration. A worm gear reducer that passes these three stages without issue has no installation problems that need investigation.
Error 6: Skipping the 50–100 Hour Initial Oil Change
What happens: The worm wheel run-in process inside any new worm gear reducer generates bronze wear particles in the first 50–100 operating hours. These particles suspend in the oil and cycle through the gear mesh with every revolution. Each particle that passes through the mesh acts as an abrasive between the precision-ground worm thread and the bronze tooth face — accelerating wear beyond the designed run-in rate.
Correct technique: Change the oil at 50–100 hours unconditionally. Inspect the drained oil — a light bronze tint is normal; heavy copper flakes are not. After this change, subsequent intervals follow the standard maintenance schedule (typically 4,000 hours with mineral oil, 8,000 hours with synthetic PAO). This single action adds years to worm gear reducer service life for the cost of one oil change.
Error 7: Installing Hollow Shaft on Driven Shaft Without Lubricating the Bore
What happens: The hollow shaft bore on the worm gear reducer and the driven shaft surface form a fitted contact under the torsional load. Under vibration and load cycling, the two surfaces undergo micro-movement (fretting). Without lubrication between bore and shaft, fretting corrosion develops — iron oxide from the shaft surface and bronze/aluminum oxide from the bore build up as a corrosion compound that bonds the two surfaces together. After 6–12 months, disassembly may be impossible without damaging both the shaft and the worm gear reducer bore.
Correct technique: Apply a thin film of anti-fretting compound or multi-purpose grease to the bore interior and driven shaft surface before assembly. Install a dust cap at the bore end to prevent contamination of the bore-shaft interface during service. If removal is ever needed, heat the worm gear reducer housing (not the driven shaft) to 80–100°C to expand the bore and ease removal.
Error 8: Blocked Vent Plug (Shipping Tape or Paint Overspray)
What happens: As the worm gear reducer warms up during operation, internal air pressure rises above ambient. The vent plug is designed to equalize this pressure with the atmosphere. A blocked vent plug causes pressure to build inside the housing. When the unit cools down after shutdown, the pressure drops, potentially drawing moisture in past a shaft seal. Over multiple cycles, oil seal leakage begins — not from worn seals, but from pressure-differential forcing oil through an otherwise-functional seal lip.
Correct technique: Check the vent plug before commissioning — remove any tape, paint, or thread sealant from the vent port. Confirm airflow through the vent by briefly blowing through it. Clean the vent at every oil change. If the installation environment is excessively dusty, replace the vent plug with a filtered vent plug that prevents dust entry while allowing air pressure equalization.
Error 9: Exceeding Output Shaft Overhang Load Limit
What happens: When a belt pulley or chain sprocket is mounted on the output shaft of the worm gear reducer and the belt or chain tension is set without checking the maximum allowable radial force (Fr₂), the output shaft bearings experience a combined radial load exceeding their design calculation. The effect accumulates as bearing fatigue — progressive pitting of the inner race — until the bearing becomes noisy and fails.
Correct technique: From the datasheet, find Fr₂ for the selected worm gear reducer at the actual overhang distance. Calculate the belt tension from the minimum tension required to transmit torque without slipping — never “tighten until tight.” V-belt tension gauges are inexpensive and remove all guesswork. For chain drives, calculate the chain pre-tension required for the specific sprocket size and transmitted torque.
Error 10: No Shaft End Cover on Upward-Pointing Input Shaft Installation
line-height:1.78;margin:0 0 8px;”>What happens: When the worm gear reducer input shaft points upward — either in a vertical mounting or in an M4/M5 orientation — the shaft keyway and the gap between the shaft end and the housing form an unprotected channel. Dust, water, and airborne particles accumulate on the shaft surface above the lip seal, collecting into an abrasive slurry that accelerates seal lip wear and eventually migrates under the seal lip into the housing.
Correct technique: Install a shaft end cap or shaft cover plate over any upward-pointing shaft extension. This is a simple sheet metal or plastic cover that protects the shaft-seal interface from contamination accumulation. The cover does not need to be elaborate — it simply needs to prevent direct exposure of the shaft surface above the seal to the environment. In dusty environments, a labyrinth-type shaft cover significantly extends seal service life.

Post-Installation 10-Minute Self-Check
| Check Item | Pass Criterion | If Fail |
|---|---|---|
| Coupling or pulley installation method | Puller/press used — no hammer marks on shaft | Replace bearings before commissioning |
| Mounting surface flatness | ≤0.1 mm per 300 mm confirmed | Shim before tightening bolts |
| Shaft alignment (coupling) | Radial ≤0.05 mm; Angular ≤0.05 mm/100 mm | Re-align motor before running |
| Oil level and grade | Level at correct position for this orientation | Drain and refill to correct level |
| Vent plug position and clearance | At highest housing port; airflow confirmed | Clear obstruction; relocate to highest port |
| All fasteners torqued | Torque wrench used; values in spec | Retorque to specification |
| Hollow shaft bore lubricated | Grease applied to bore and shaft surface | Disassemble and apply grease |
| Upward shaft protected | Cap or cover installed on any upward shaft | Install cover before commissioning |
Commissioning Diagnosis: Normal vs Abnormal During Trial Run
Hluk
Normal: A consistent low hum or slight whirring sound proportional to speed. A light metallic smell during the first 5–10 hours. Noise may be slightly higher at startup when oil is cold and viscosity is high.
Abnormal: Periodic clicking or knocking synchronized to shaft rotation (indicates a hard particle in the mesh or a localized high spot on the worm thread). Continuous grinding sound (indicates metal-to-metal contact — possibly insufficient oil or misalignment). High-pitched whine that increases with load (often indicates bearing issue from installation damage).

Teplota
Normal: Housing surface temperature rises to stabilize at 25–45°C above ambient during continuous no-load operation. At full load, housing surface 35–55°C above ambient.
Abnormal: Temperature still rising after 45 minutes at full load (thermal power limit being exceeded — see K-05). Localized hot spot at one shaft seal end significantly hotter than housing body (bearing damage or misalignment).
Oil Seepage
Normal: A light oil film at the worm gear reducer shaft seal exits during the first 30 minutes of operation, not dripping actively. This is the seal lip conforming to the shaft surface and stops naturally.
Abnormal: Active dripping within the first 30 minutes of operation (wrong oil level, housing distortion, or damaged seal from installation). Any dripping after 2 hours of operation at operating temperature.

Frequently Asked Questions — Installation Mistakes
After installation, the dial indicator shows alignment is slightly out of tolerance. Must the unit be taken apart and realigned, or can I run it?
The 50–100 hour oil change was missed and the unit has been running for 500 hours. Is it too late to change the oil?
A belt pulley was installed with the keyway facing the wrong direction (180° off). How is it removed without damaging the shaft?
During the trial run, there is a mild metallic smell. Is this a problem?
After 24 hours of operation, the worm gear reducer is noticeably quieter than when it was first started. Is this normal or a sign that something loosened?
The shaft has slight surface rust when unboxed. Can it still be used?
Installation Support for Worm Gear Reducer Applications
Korea Ever-Power provides dimensional drawings, installation manuals, and technical support as standard with every worm gear reducer order. If you have an installation question not covered here, our engineering team is available to assist. Browse our rozsah šnekových reduktorov or contact us for application support.
Redaktor: Cxm


